
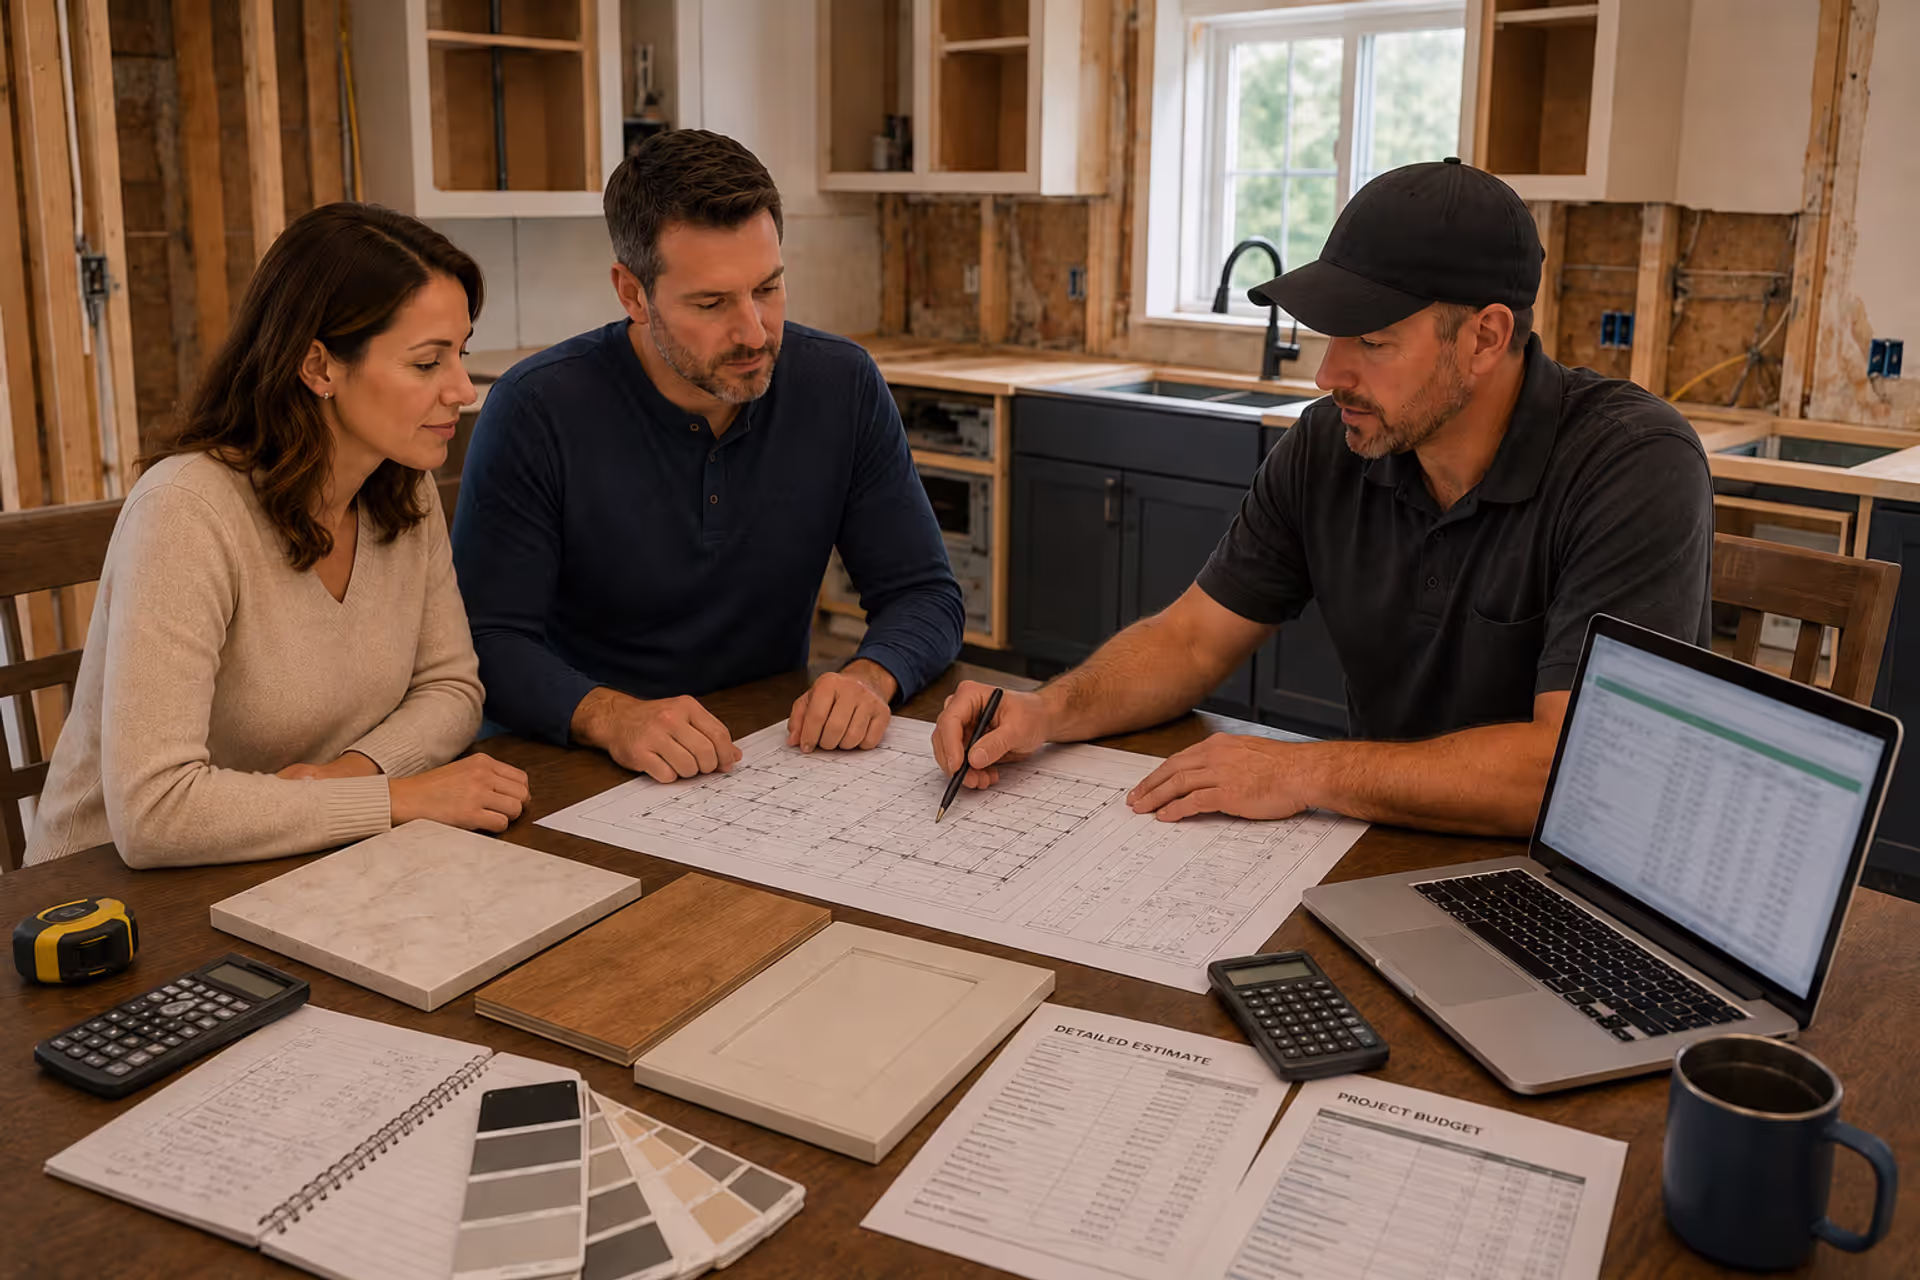
Homeowners estimating remodeling costs with a contractor
How to Estimate a Remodeling Job?

Content
Most homeowners think estimating a remodel means adding up material costs and labor quotes. Then reality hits. You're three weeks into your kitchen renovation, you've already spent 80% of your budget, and the plumber just found corroded pipes behind your walls that need replacing. This scenario plays out in roughly one-third of all home renovations because people forget that estimation isn't just math—it's detective work combined with strategic planning.
A solid estimate accounts for everything you can see (cabinets, countertops, flooring) plus everything you can't (old wiring, hidden water damage, code upgrades). You'll need to factor in materials, labor costs, permit fees, and a cushion for surprises. Get this foundation right, and you won't be eating takeout in a half-finished kitchen for three extra months because your money ran out.
Understanding the Scope of Your Remodeling Project
Pin down exactly what you're doing before you price a single thing. Sounds obvious, right? Yet scope creep—that sneaky expansion of "just one more thing"—kills more budgets than expensive tile ever will.
Walk through each room you're touching with your phone and a notebook. Photograph everything. Write down every change you want, including the boring stuff nobody sees. Are you moving walls? Upgrading your electrical panel from 100 to 200 amps? Rerouting plumbing? Each decision creates a domino effect.
Here's what matters: structural work versus cosmetic updates. Painting cabinets? That's cosmetic. Knocking down the wall between your kitchen and dining room? That's structural, and it'll cost you 3-5 times more because you'll need an engineer's stamp, a beam installation, permits, and specialized contractors.
Make two lists right now. List one: must-haves. List two: nice-to-haves. When your budget gets tight halfway through (and it probably will), you'll thank yourself for knowing which items can wait. Too many people treat everything as equally important, then scramble to cut corners when money runs low.
Renovation project coordination tips start with writing everything down. Create a scope document that lists every surface, fixture, and system you're changing. Measure rooms. Note ceiling heights. Specify materials where you've already decided. This document becomes your anchor when contractors give you bids and when you're tempted to add "just a small upgrade."
Think about chain reactions. Replace your bathtub? You'll need new tile. New tile means removing old tile. Removing old tile might reveal rotted subflooring. Suddenly your $2,500 tub replacement becomes a $7,000 project. Build this cascading logic into your planning from day one.
Renovation workflow planning means understanding what must happen before what else can happen. You can't install cabinets before the electrician runs wiring. You can't paint before the drywall's smooth. Map out these dependencies—it helps you estimate both timeline and coordination costs.
Breaking Down Remodeling Cost Components
Now we get into actual numbers. Every estimate has five parts: materials, labor, permits, contingency money, and the costs everyone forgets about. Skip one and you're building on quicksand.

Author: Caleb Norton;
Source: johnhranec.com
Material Costs and Pricing Variables
Materials typically eat up 40-50% of your total budget, though this swings wildly based on your choices.
Take flooring. Luxury vinyl plank runs $3-7 per square foot. Hardwood starts at $8 and can hit $20 for exotic species. In a 200-square-foot kitchen, you're looking at $600 versus $4,000—just for the flooring material itself.
Get real quotes for everything. Don't trust internet averages. Prices vary by location, season, and supply chain chaos. That gorgeous subway tile you found on Pinterest might be backordered for four months, which means paying rush shipping or picking something else.
You'll need extra material too. Plan for 10-15% overage to cover cuts, breakage, and mistakes. Tile and hardwood need even more—sometimes 20% depending on your layout pattern.
Big-box stores versus specialty suppliers changes your numbers significantly. Design showrooms charge premium prices but offer better service and exclusive products. Experienced contractors have wholesale accounts that save 20-30% on materials—though they may or may not pass those savings to you.
Labor Rates and Contractor Fees
Labor costs are where estimation gets complicated. Pricing varies by trade, experience level, and local market conditions.
General contractors usually charge 15-25% of the total project cost to manage everything. This covers scheduling, oversight, and keeping the job moving. Some work on markup (adding a percentage to all costs), others charge a flat management fee.
Individual trades have different pricing structures. Electricians and plumbers typically bill $75-150 per hour. Tile installers might quote by square footage ($8-25 per square foot installed). Painters often price by room or square footage of coverage.
Fixed-price versus hourly billing changes everything. Fixed bids give you cost certainty but less flexibility. Hourly billing means you pay for actual time spent, which can balloon if problems pop up. Most contractors prefer fixed pricing for well-defined work and hourly rates when there's uncertainty.
Get at least three detailed bids. Don't just compare bottom-line numbers—demand itemized breakdowns showing labor hours, rates, and specific tasks. This lets you compare apples to apples and shows you where contractors differ in their approach.
Creating an Accurate Project Timeline and Workflow
Your timeline matters almost as much as your budget, especially if you're living in the space being remodeled. Realistic scheduling prevents you from expecting to host Thanksgiving dinner in your half-demolished kitchen.
Start by sequencing work phases correctly. Demolition comes first. Then rough work—framing changes, electrical, plumbing, HVAC. After that comes insulation and drywall. Finally, finish work—cabinets, flooring, paint, fixtures.
Each phase depends on the previous one. The electrical inspector can't sign off before wires are installed. Countertops can't go in before cabinets are level. Draw this out visually if it helps you see the flow.
Buffer time separates realistic schedules from fantasy. Add 20-30% to every timeline estimate. Inspectors get backed up. Materials arrive late. Contractors juggle multiple jobs. Weather interferes.
A typical kitchen remodel takes 6-12 weeks under normal conditions. Bathrooms run 4-8 weeks. Full-house renovations stretch 3-6 months. These are ranges, not guarantees.
Season matters for both timeline and cost. Contractors stay busier in spring and summer, which can mean higher prices and longer waits. Winter projects might cost less but weather can stall exterior work.
Tracking renovation progress requires milestones, not just a completion date. Break your project into weekly checkpoints. This reveals delays early and lets you adjust expectations before small problems become disasters.
Set decision deadlines upfront. You need to pick tile by week two, not week four when the installer shows up ready to work. Delayed decisions cost money—either through contractor idle time or rush material fees.
Setting Up Your Renovation Kickoff Meeting
This first meeting sets the tone for your entire project. Do it right and you'll prevent 80% of the communication problems that derail renovations.
Schedule this before work starts, with everyone who matters present—your general contractor, key subcontractors if you hired them separately, and all household decision-makers.

Author: Caleb Norton;
Source: johnhranec.com
Your renovation kickoff meeting guide should cover these topics:
Communication protocols. Who's your main contact? How should you reach them—text, email, phone? What response time should you expect? Daily updates or weekly summaries?
Site logistics. Where do workers park? Which door should they use? What bathroom can they access? Can they use your water and electricity? These details seem trivial until they cause daily friction.
Work hours. What time does work start and end? Can they work weekends? This matters hugely if you're living there or have close neighbors.
Schedule review. Go through the timeline together. Mark critical dates—inspections, material deliveries, decision deadlines, payment milestones.
Change order process. How will you handle scope changes? Document this clearly. Every change should require written approval showing cost and schedule impact before work proceeds.
Quality standards. Show reference photos of what you want. Discuss workmanship expectations. Better to align on "good enough" versus "perfect" now than argue about it later.
Renovation communication with contractor tips: put everything in writing. Follow up verbal conversations with email confirmations. Take photos throughout the project. Keep a binder with contracts, receipts, warranties, and all correspondence.
Schedule regular milestone reviews. Weekly meetings work well for active projects. These aren't just status updates—they're chances to catch problems early and make small corrections.
Managing Contractors and Tracking Progress Throughout the Remodel
Your estimate's done. Construction's underway. Now comes the real challenge: keeping things moving forward.
Managing contractors during a remodel doesn't mean micromanaging every nail they hammer. It means staying informed and accountable while respecting their expertise.

Author: Caleb Norton;
Source: johnhranec.com
Stop by the site regularly but predictably. Random surprise inspections create tension. Scheduled check-ins work better. Most contractors appreciate engaged homeowners who respect their process.
Use your milestone schedule as a tracking tool. Are tasks finishing on time? When delays happen, what's causing them? Some delays are legitimate—permit delays, weather, supply issues. Others signal deeper problems—poor planning, contractor overload, or scope confusion.
Homeowner responsibilities during renovation include making decisions on time, keeping the site accessible, and paying promptly when milestones complete. You're part of the team, not just a customer.
Payment schedules typically follow milestones: initial deposit at signing (10-20%), payment after demo and rough-in (25-35%), payment when major work finishes (30-40%), final payment after walkthrough and punch list completion (10-20%). Hold back that final payment until everything meets your standards.
How to manage a renovation project effectively means staying organized. Keep a running list of questions and concerns. Address them together during weekly meetings instead of texting every thought that pops into your head.
Document change orders immediately. Contractor suggests moving a light switch? Get the cost impact in writing before you agree. Verbal agreements dissolve into conflicting memories.
Track spending against your budget weekly. Use a simple spreadsheet comparing estimated versus actual costs. This early warning system lets you adjust before financial problems snowball.
Renovation project management tips from pros: trust but verify. When something looks wrong, speak up. Most contractors appreciate catching mistakes early. If tile installation doesn't match your approved sample, say something before they finish the entire room.
The biggest mistake homeowners make is assuming the estimate is the final cost. A good estimate includes contingency for unknowns, but it's still an educated guess until we open walls and see what's really there. I tell every client: budget for surprises, because surprises will happen.
— Martinez Roberto
Common Estimating Mistakes and How to Avoid Them
Even experienced homeowners torpedo their own estimates. Let's make sure you're not one of them.
Skipping contingency funds. This mistake is fatal. Set aside 15-20% extra for unexpected discoveries. Think that's excessive? It's not. Hidden water damage, outdated wiring that doesn't meet current code, asbestos in old flooring—these aren't rare. They're normal.
Ignoring permit costs and timeline. Permits aren't just fees (though those add up—$500-3,000 depending on scope). They take time. Permit approval takes 2-6 weeks in most areas. Required inspections create scheduling constraints. Factor this into both budget and timeline.
Poor contractor vetting. Choosing the lowest bid often backfires. Check licenses, insurance, references, and past work quality. A contractor bidding 30% below everyone else might be cutting corners you'll pay to fix later.
Underestimating finish costs. Fixtures, hardware, lighting, and trim seem like details. They're not. These "finishing touches" easily hit $5,000-15,000 in a kitchen remodel. Price them specifically.
Forgetting temporary living costs. Major remodels might mean more restaurant meals, laundromat trips, or temporary housing. A month of these extras adds up fast.
Uncontrolled scope creep. The ultimate budget killer. "Since we're already here" becomes dangerous. Every addition costs money and time. Some additions make sense—fixing discovered problems, adding real value. Others are impulse upgrades that wreck your budget.
Ignoring furniture and decor. Your renovated kitchen looks amazing. But you need bar stools, new light fixtures, maybe new appliances. These aren't in construction estimates but they're part of your real cost.
Overestimating DIY capability. Doing some work yourself saves money, right? Sometimes. But if you work full-time, DIY tasks take 3-4 times longer than you think. That delays the whole project, potentially costing more through extended contractor coordination.

Author: Caleb Norton;
Source: johnhranec.com
Remodeling Cost Estimation Methods Compared
| Estimation Method | Advantages | Drawbacks | How Accurate | When to Use It |
| DIY Calculation | Free; you control every detail; you learn a lot | Takes forever; you'll miss stuff; no pro verification | Not very (±30% off) | Early budgeting; small projects; if you're very motivated |
| Contractor Bid | Professional expertise; includes labor; reflects your local market | Needs clear scope first; bids vary wildly; takes time to collect | Pretty accurate (±10-15%) | Any contractor project; best for clear, defined scopes |
| Cost-per-Square-Foot | Super fast; easy math; good for rough comparisons | Misses project specifics; huge regional differences; ignores quality levels | Rough estimate (±40%) | Initial concept stage; comparing project sizes; reality checks |
| Online Estimator Tools | Fast answers; free or cheap; gives you itemized lists | Uses generic prices; might not match your area; limited customization | Moderate (±20-25%) | Early research; understanding cost categories; supplementing other methods |
Sample Remodeling Project Milestone Timeline
| Project Phase | When It Happens | What You Need to Do | What Contractor Delivers |
| Planning & Design | Weeks 1-4 | Make all design decisions; pick materials; approve final plans | Full scope document; material specs; schedule; cost breakdown |
| Permits & Approvals | Weeks 3-6 | Sign permit paperwork; provide access for inspections | Submitted applications; approved permits |
| Demolition | Week 7 | Clear out affected areas; move belongings; arrange dumpster access | Completed demo; hauled debris; prepped work area |
| Rough-In Work | Weeks 8-10 | Finalize fixture locations; approve any changes | Finished framing; electrical; plumbing; HVAC; passed inspections |
| Insulation & Drywall | Weeks 11-12 | Confirm wall locations; approve modifications | Installed insulation; hung and finished drywall |
| Interior Finishes | Weeks 13-16 | Confirm final fixture selections; pick paint colors; choose hardware | Installed cabinets; countertops; flooring; tile; trim |
| Fixtures & Final Details | Week 17 | Do walkthrough; create punch list; test all systems | Installed lighting; mounted plumbing fixtures; connected appliances; installed hardware |
| Final Inspection & Closeout | Week 18 | Make final payment; get warranty docs; sign completion paperwork | Passed final inspection; cleaned site; handed over documentation |
FAQ: Remodeling Estimation Questions Answered